Learning how to
… use Wax
Facets is a Wax theme. Wax in turn relies on Jekyll. To use Facets you need to be familiar with both Jekyll and Wax. To learn more about setting up and using Wax visit the Wax wiki. You can learn more about using Jekyll on the Jekyll docs, or in this great tutorial by Amanda Visconti at Programming Historian.
… create a faceted gallery
As other Wax sites, Facets depends on the metadata you create. Let’s assume you are using a CSV to record data for your collection. In order for Facets to work, that CSV must have designated columns for each large category you want to “facet” by. These become the facet headers at the top of the drop-down menus above the gallery. Each of these columns then accepts a small range of sub-categories, or facet values. These become the check boxes.
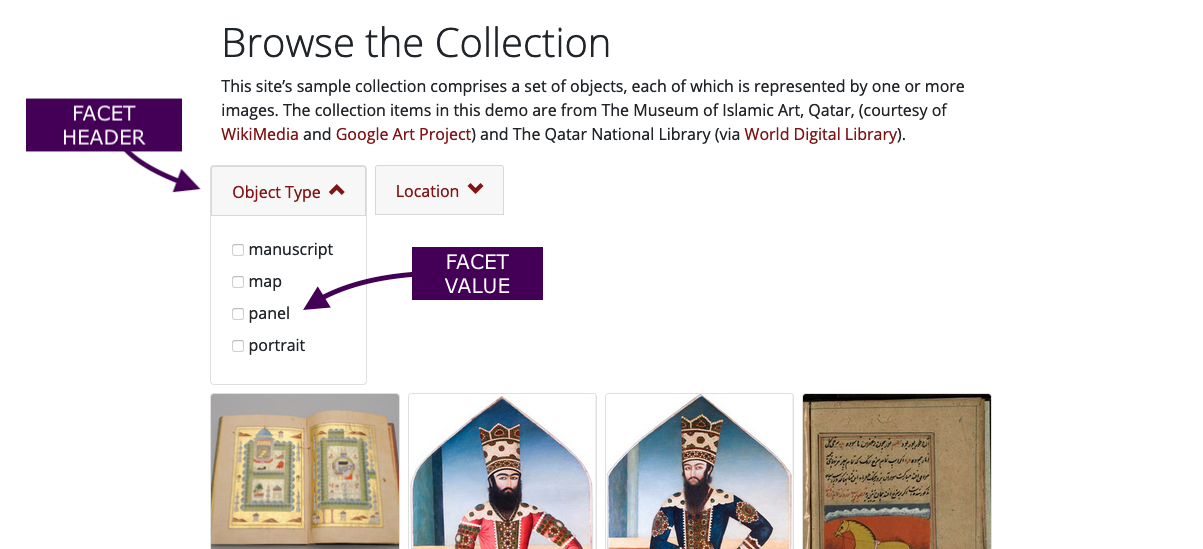
The first step before creating a facet gallery on any one of your pages is to add gallery: True to your YAML header. See the example at the top of our collection.md file.
Next, we tell Facets what collection gallery to insert and what columns to facet by with a Jekyll include command that brings in the gallery at the desired place on the page. This include snippet requires a collection: variable and a facet_by: variable. You can also pass an optional variable to control the number of columns displayed on large screens: num_column:. This theme already comes with the following example in the Browse page. In order to use it, just replace the sample values with your own when editing the page:
{% include gallery.html collection='qatar' facet_by='object_type|location|tags*' num_column=4 %}
Notice that instead of the original collection_gallery.html we use gallery.html.
For the facet_by: variable, specify one or more field names in a pipe-separated list. Use an asterisk (*) after the field name if its entries contain multiple values (See below for more details). For the num_column: variable, specify a number that is a divisor of 12 (i.e, 1, 2, 3, 4, or 6). This is the number of columns you want to have. If you don’t include the num_column: variable, the default is 6 columns.
… use facets with multiple-value entries
Say for example you’re trying to use tags in your project, or describe cultural objects that may or may not be in multiple languages. In our qatar data we have a tags column with entries like text,text|people,flora|people|fauna. Some of these entries have only one value, some have several. Facets allows you to isolate all the unique individual values and create a facet selection form based on them. In order to command facets to treat a particular facet as multi-value, just add an asterisk (*) to the facet in your facet_by: variable, as in the example from the Browse page:
{% include gallery.html collection='qatar' facet_by='object_type|location|tags*' num_column=4 %}
Notice that in this case, tags* has an asterisk. Our default separator for multi-value categories is the pipe (|), but you can change this preference at the top of the gallery.html file in the _includes folder.
… create a subset gallery
Facets also allows you to create galleries for subsets of your collections. A subset collection will only include items that have a truthy value for that specific “field value.” Consider the first example we use in ‘Exhibit with Subset Collection’:
{% include gallery.html collection='qatar' field='object_type' value='portrait' num_column=4 %}
The gallery that results from this instruction only shows portraits. This include command is slightly different than the one for browsing the whole collection. They both share a collection: and a num_column: variable. To use this include, though, you need to declare a field: variable. This is equivalent to a column from your data. Then you pick the value: that you want to limit results to.
The facet_by: is optional. If we don’t want to facet further, as in this case, we simply leave it out. In the second example on the same page, we create a subset based on one category and facet_by two others, location and current_location.
{% include gallery.html collection='qatar' field='object_type' value='manuscript' facet_by='location|current_location' num_column=4 %}
… change our design
Facets is a prototype, just as Wax itself is a prototype, a tool to think with that is also immediately practical. Both of these are built on Jekyll, which allows you an enormous amount of flexibility for changing the design of your site. Feel free to play around with the code that makes our exhibit pages and our galleries tick. The more you transform our work, the more we will feel like we succeeded.
The CSS that determines the look of the site is done using a combination of SASS and the bootstrap framework. To change some common variables, like colors or fonts, you can edit the /assets/css/style.scss file. You can always override our own choices from this file as well. You can also add your own CSS files to the _sass folder, and simply import them into the main sass file above.
To change the description section of our cards, for ex. “A manuscript from Turkey (1801),” go to the “CONSTRUCTED CARD TEXT” section of the gallery.html file.
… use Facets with another Wax theme
In theory, Facets should be able to be transferred to another Wax theme following four simple steps.
- Copy our gallery.html file into your
_includesfolder. - Copy our facets.js file into wherever you keep your JavaScript files. The Main Wax theme for example uses the
/assets/folder directly. Make a note of where you put it. You will use the path in the next step. - Load our javascript file from step #2 into your relevant layout. The easiest way is just to place the following line at the bottom of your default layout:
<script type='text/javascript' async defer src='{{ "/assets/facets.js" | absolute_url }}'></script>
The other alternative is to create a layout just for galleries and place the script there, like we do in the Facets theme. - Copy the “FACET BUTTONS” section of our “_facets.scss” file at the end of your SASS or CSS file. We put this section at the end of our file for your convenience. If you are working with the original Wax theme, this snippet would go at the end of the “/_sass/_wax.scss” file.
N.B. Make sure to call the right file in your include command. Notice we’re calling it gallery.html and not collection_gallery.html as we would normally. Ex:
{% include gallery.html collection='qatar' facet_by='object_type' num_column=4 %}
After these steps you might still want to tweak the final results. For example, if you’re transferring to the original Wax theme, you might want to tweak the font size and the bottom margin on the buttons. We’ll leave the final pixel-pushing to you.